
WordPress is the platform most affiliate marketers use to build their websites, but knowing that does not make the setup process feel any less confusing when you are starting from scratch. There are hosting plans to compare, a domain to register, nameservers to update, a fresh WordPress installation to configure, and a list of plugins and settings that nobody has explained in the right order before you arrived here. Most beginners stall somewhere between the hosting setup and their first published page, not because the process is technically difficult, but because nobody has walked them through it clearly and in sequence.
This guide does exactly that. It covers every step of setting up a WordPress website for affiliate marketing in the order it actually happens, with enough detail to follow without any technical background. If you have never built a website before, that is fine. This is written from the experience of going through the same setup process and making several of the mistakes covered here firsthand.
Why Your Website Is the Starting Point
Affiliate marketing works through a specific sequence: a reader searches for a solution, finds a piece of content that addresses their question, and trusts the recommendation enough to act on it. Most people working on affiliate income spend their energy on which products to promote, but the platform used to publish that content shapes the result just as much as the product choice does. A website is the only place where you control every step of that sequence. On a social platform, the algorithm decides who sees your content and when. Your website does not work that way. What the reader encounters when they arrive, and how your recommendations are presented, depends entirely on decisions you make.
Search traffic matters here for a specific reason. Readers who arrive through a search query are already trying to solve something. They are not browsing passively or waiting to be persuaded. A piece of content that directly answers the question they searched for earns both the click and the trust that comes from feeling genuinely helped.
What a website provides over time is a compounding content library. Each article you publish creates an additional entry point for readers to find your site, but only if each entry point genuinely answers the question attached to it. What makes the library useful is whether individual pages answer specific questions well enough that the reader does not need to search again. A page that does that earns both the visit and the possibility of trust.
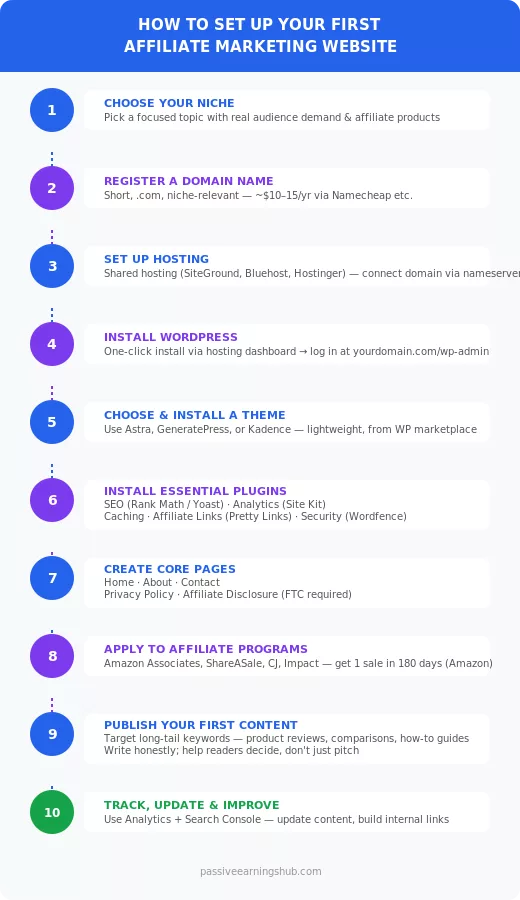
Step 1: Choose Your Niche Before Anything Else
Everything else in this guide depends on knowing what your website is about and who it is for. Without that clarity, decisions about your domain name, your content, and your affiliate programs become much harder.
A niche is not just a broad topic. It is a focused segment of a broader category that serves a specific type of reader. Fitness as a niche is too wide to be actionable. A more specific angle, such as home workouts for people in their 40s with bad knees, gives you a clear audience and a clear direction for both your content and your product recommendations.
A workable niche has a few qualities worth confirming before you commit. You should have a genuine interest in the topic because you will be writing about it regularly. There also needs to be an audience actively searching for answers in that space. A quick check through Reddit threads or a keyword research tool will confirm whether that audience exists. Having affiliate products you can recommend matters honestly as well, because that is how you eventually earn from the site.
Take time here. Changing your niche after building content means either deleting work that no longer fits, keeping it and running a disjointed site that sends mixed signals to search engines, or starting a separate site from scratch. None of those are good options.
Step 2: Register a Domain Name
Your domain name is the address people type to reach your site, but for an affiliate website, it serves an additional function. It appears alongside your content in search results, and readers encountering your listing for the first time use it as a quick credibility signal before they read anything else. A domain that looks assembled or difficult to remember can cost you the click even when the content behind it is good.
Keep the name short, relevant to your niche topic, and as close to a .com as you can find. The .com extension is so widely expected that if someone hears your domain name spoken aloud, they will default to typing .com regardless of what you tell them. Registrars like Namecheap make the search and purchase process straightforward. Domain registration typically costs around ten to fifteen dollars per year.
Avoid hyphens and numbers in the name. Both create the same practical problem: they are harder to communicate verbally, harder to type accurately from memory, and tend to appear in search results in a way that looks assembled rather than intentional.
Once your domain is registered, you will connect it to your hosting account. That connection is covered in the next step.
Step 3: Set Up Hosting
Beginners tend to overthink the hosting decision more than almost any other part of this process, reading comparisons and reviews for days before committing to a plan that, for a new site with no traffic yet, will perform about the same regardless of which reputable provider they choose. A hosting account is where your website files actually live. When someone types your domain into a browser, the request routes to your hosting server. That server loads and delivers your site. Without hosting, your domain name has nowhere to point.
For beginners, shared hosting is the most practical starting point. It is affordable and provides enough resources to run a new site comfortably. Providers like SiteGround, Bluehost, and Hostinger are commonly used by affiliate marketers because they are beginner-friendly and include one-click WordPress installations as part of their setup.
When you sign up for hosting, you will go through an onboarding process where you either transfer an existing domain or connect the new one you just registered. Your host will provide nameserver details that you update inside your domain registrar account. This tells the internet’s directory system where to route traffic when someone visits your domain.
One practical note for this step: the nameserver update does not take effect immediately. The process of your hosting details spreading across the internet’s domain name system can take anywhere from a few hours to 48 hours. During that window, your domain may not resolve or the site may appear blank. That is a normal part of the process and does not mean something went wrong. Give it time before troubleshooting.
Once your hosting account is active and your domain is connected, you are ready to install WordPress.
Step 4: Install WordPress
WordPress handles everything involved in running a content website without requiring you to write code or manage files manually. Everything from publishing articles to installing plugins and adjusting your design happens through a single browser-based dashboard. That dashboard is where you will spend most of your time, and getting familiar with it is one of the first things that happens after installation.
Most hosting providers offer a one-click WordPress installation through their control panel. Look for a section labeled WordPress or Website Installer inside your hosting dashboard. Click through the prompts, choose the domain you want to install WordPress on, set your admin username and password, and let the installer run. When I first went through this process using the Wealthy Affiliate starter training, the installation was complete before I expected it to be. The steps look more involved when written out than they feel in practice.
Once installation is complete, you can log in at yourdomain.com/wp-admin using the credentials you just created. The dashboard will look busier than expected at first. There are menus on the left covering Posts, Pages, Appearance, Plugins, and Settings, and most of these you will not need immediately. The areas you will use first are Appearance for your theme and Plugins for the tools covered in the next step.
Step 5: Choose and Install a Theme
The theme you choose shapes the entire reader experience on your site. Load speed, mobile presentation, and how easily your content can be read all flow from this one decision. For a new affiliate site that depends on search traffic and reader trust, those practical qualities matter more than visual complexity.
Astra, GeneratePress, and Kadence are three themes affiliate marketers commonly use because they are lightweight and straightforward to configure. All three are available in the WordPress theme directory. From your dashboard, go to Appearance, then Themes to search for any of them. Search for the theme you want, install it, and activate it.
After activating your theme, spend some time in the WordPress Customizer. Add your logo if you have one, set your brand colors, and choose a readable font. Keep the design simple. The purpose of your theme is to make your content easy to read and navigate, not to impress visitors with visual complexity.
The advice to choose a marketplace theme comes from direct experience. On my first site, I bought a third-party theme that was not available through the WordPress marketplace because I wanted a more customized look. Updating it meant downloading each new version from the developer’s website and transferring it manually to my WordPress installation via FTP. It worked the first time, so I assumed the process was manageable. On the second update, something went wrong during the transfer, and the site stopped displaying correctly. Fixing it took longer than I expected, and all of that time went into recovering something that had been working before I touched it.
Whether the weeks spent on that problem set the site back in any measurable way, I am genuinely not sure. The content decisions I was making at the time probably had more effect on performance than the theme issue did. But those weeks were not spent writing, and that gap at the beginning of a site is harder to recover from than it sounds.
The themes available through the WordPress marketplace, Astra, GeneratePress, and Kadence, among them, update with a single click from your dashboard. Without the complications of manual FTP transfers, an update is just a button click, and the risk of breaking something during the process disappears entirely. Choose one from the marketplace, configure it properly, and leave it.
Step 6: Install the Essential Plugins
Every feature your WordPress site needs beyond basic content publishing comes from a plugin. The challenge is that there are thousands of them, and installing too many slows your site down in ways that affect both user experience and search rankings. An affiliate site at the start needs five categories covered and nothing more, and that is a shorter list than most plugin guides would suggest.
The first plugin worth installing is an SEO plugin. Rank Math and Yoast SEO are the two most commonly used options for affiliate sites. Both help you manage page titles, meta descriptions, and basic on-page SEO settings from your dashboard without requiring you to understand the technical background.
An analytics plugin connects your site to the tools that let you track performance. Google Site Kit is a straightforward option that links your site directly to Google Analytics and Google Search Console, so you can see how many people are visiting, which pages they read, and what search terms brought them to your site.
Caching is worth setting up early as well. A plugin like WP Fastest Cache or W3 Total Cache reduces your page load times by storing certain elements so they do not reload from scratch on every visit. Google measures page speed through Core Web Vitals, and poor loading performance can suppress search rankings regardless of how well the content is written. Setting up caching from the start means you are not retrofitting it later when your content library is larger.
Affiliate link management is handled well by either Pretty Links or ThirstyAffiliates. Both let you turn long affiliate tracking URLs into clean, readable links under your own domain. When you have dozens of affiliate links spread across many posts, having them organized in one place means updating a changed URL takes minutes rather than hours of searching through old content.
Rounding out the essentials, a security plugin like Wordfence monitors for unusual login attempts and common vulnerabilities without requiring much configuration on your part.
Beyond these five areas, be cautious about adding more. Each plugin adds some weight to your site, and too many running together can slow things down noticeably.
Step 7: Create Your Core Pages
Most affiliate sites need the same small set of pages in place before you start publishing content. These pages are not part of your content strategy, but they are part of how the site presents itself to first-time visitors, affiliate program reviewers, and search engines.
The homepage and About page are where readers form their first impression of who you are and what the site covers. Your homepage can be simple at this stage: the niche it covers, who it is for, and what kind of content a reader can expect to find. The About page is where that explanation becomes personal. Readers who are close to trusting a recommendation often visit the About page first to understand the person behind it. That visit matters. An honest explanation of why you started the site and what experience informs your recommendations carries more weight than a polished biography.
A Contact page gives readers and potential partners a way to reach you. A form or a published email address is enough.
The pages most beginners deprioritize are the Privacy Policy and the Affiliate Disclosure, and that is a mistake with direct consequences. Many affiliate programs, including Amazon Associates, review your site before approving your application, and missing or incomplete compliance pages are among the most common reasons applications are rejected. The Privacy Policy explains what data your site collects through analytics or email tools. Your Affiliate Disclosure states clearly that your content contains affiliate links. In the United States, the FTC requires that this disclosure be clear and conspicuous, meaning it should appear near the affiliate content rather than buried in a footer or a terms page. Both documents need to be written in plain language and linked in your site footer so they are reachable from every page.
Step 8: Apply to Affiliate Programs
With your site live and your compliance pages in place, you are ready to apply to affiliate programs. The order matters here because some programs, Amazon Associates included, review your site as part of their approval process. A site with no About page, no disclosure, and no published content is likely to be rejected regardless of how you fill out the application.
Amazon Associates is the most common starting point for new affiliates covering physical products. The application process is accessible, and the product catalog covers almost any niche. The platform comes with one requirement that the welcome email does not emphasize clearly enough to be useful. Amazon requires at least one qualifying sale within your first 180 days of membership. If that does not happen, your account is automatically closed. You can reapply, but you lose your account history in the process. Starting with a small number of well-placed product recommendations rather than waiting until your traffic grows is the more practical approach.
For niches that focus on digital tools, software, or online services, affiliate networks like ShareASale, CJ Affiliate, and Impact each host multiple programs under one application portal. Many software companies also run their own private programs outside these networks, often with recurring commission structures where you earn monthly as long as a referred customer remains subscribed.
Once accepted into a program, use your link management plugin to record every affiliate link by program and product. When a product changes its URL, or a program closes, having your links organized in one place means updating them across your site takes minutes rather than hours of searching through old posts.
Always disclose your affiliate relationships at the top of any post containing affiliate links. This is a legal requirement in many countries, and most readers appreciate the transparency.
Step 9: Publish Your First Content
Search traffic reaches your site through the articles you publish. A reader types a question into Google, your page appears in the results, and if the title and description match what they were looking for, they click through. That mechanism only works if the content you publish targets the specific phrases those readers are actually searching for.
Start by targeting long-tail keywords. These are specific search phrases with lower competition than broad terms. A new site carries no established authority in Google’s index, which means broad keywords attracting thousands of monthly searches will not rank regardless of how well the content is written. A phrase like “best affiliate marketing course for beginners under a hundred dollars” is far easier for a new site to rank for than “affiliate marketing course.”
The types of content that perform well in affiliate marketing are product reviews, comparison posts, and how-to guides. Reviews and comparisons both serve readers who are already close to a purchasing decision, the difference being whether they are evaluating one product or choosing between several. How-to guides attract traffic from readers who are earlier in the process, working through a problem where the right tool is part of the answer.
The practical distinction is between a page that answers a question and a page that exists to funnel a reader toward a purchase. In practice, that means writing about a product’s limitations as honestly as its strengths. If a product is not right for a particular type of reader, saying so is more useful than steering them toward a purchase anyway. Readers notice when a review is written to persuade rather than inform, and that recognition affects whether they trust the next recommendation they read from the same site.
Step 10: Track What Is Working and Keep Improving
Once your first few posts are published, the site starts talking back. The data coming back from Google Analytics and your affiliate dashboards tells you more than instinct can at this stage. Traffic numbers alone do not tell the full story. A page that attracts many readers but generates almost no affiliate clicks is a different kind of problem from one that converts well but barely gets found. The first usually needs a clearer recommendation or a better link placement. The second needs more internal links pointing toward it from your other content so that search engines understand its relevance.
The most revealing metric in those early months is not earnings but which pages are being found at all. On a new site with limited content, most pages attract almost no traffic. The ones that do stand out clearly and are worth studying before writing more content in the same direction, because they show you which topics the site is actually being discovered for.
Getting into the habit of updating older content regularly pays off over time. Search engines favor pages that stay accurate and current, and even small improvements to an existing post can lift its ranking gradually. Google Search Console shows you the exact queries drawing readers to each page, their current ranking positions, and how many impressions they receive without clicks. A post that sits on page two for its target keyword is often closer to page one than its position suggests, and a focused update can be what closes that gap.
Building an affiliate site takes longer than most people expect when they start. How long varies enough that any specific number would mislead more than it helps, but the pattern is consistent: the early months produce little visible progress, the content accumulates, and at some point the site begins receiving enough traffic to generate meaningful data and occasional income. That point tends to arrive later than the initial timeline most people set for themselves.
Technical decisions made during setup often turn out to matter more than they appear to at the time. The weeks spent fixing a broken site after a failed theme update were the clearest reminder from my own experience of how a single early choice can shape the time available for the work that actually builds traffic. Whether that delay meaningfully affected the site’s eventual performance, I cannot say with certainty. Those weeks are gone regardless.
When the site reaches a point where traffic is steady and some of the early content is earning consistently, the work done in the setup phase is what makes that possible. A site built on the right platform, with clean compliance, organized links, and content aimed at specific reader questions, performs differently from one put together without thinking those decisions through.

This article provides a solid guide for beginners. I especially appreciate the focus on choosing a niche that aligns with your interests and finding reliable hosting. While the steps are straightforward, it’s important to remember that success in affiliate marketing takes time, quality content, and consistent effort. Overall, it’s a great starting point for anyone looking to dive into affiliate marketing.
Thank you so much for the kind words and thoughtful insights! I’m really glad you found the guide helpful. You’re absolutely right—while the steps may seem simple on paper, it’s the consistent effort, patience, and commitment to quality content that truly make the difference in the long run.
Choosing a niche you genuinely care about makes the journey not only more enjoyable but also more sustainable. And yes, reliable hosting is such a foundational piece that often gets overlooked by beginners!
Appreciate you taking the time to share your thoughts—wishing you tons of success on your affiliate marketing journey! Let’s keep growing together!